
컬쥐네 다락방
IaC를 이용한 클라우드 환경에서의 Wordpress 자동화 배포 본문
IaC를 이용한 클라우드 환경에서의 Wordpress 자동화 배포
목차
- 프로젝트 개요
1-1) 목표
1-2) 진행 기간
1-3) 인프라 구축 환경
1-4) 아키텍쳐 구성 - AWS 환경 배포
2-1) Vagrant 환경 구축
2-2) Ansible 환경 구축
2-3) Ansible Playbook 작성
2-4) Terraform 환경 구축
2-5) Terraform 파일 작성
2-6) Terraform 실행 결과 확인
1. 프로젝트 개요
1-1) 목표
- Terraform, Ansible을 이용해 클라우드 환경에서 AWS와 Azure를 활용한 Wordpress 자동화 배포를 구축해본다.
1-2) 진행 기간
- 2022.04.27(수) ~ 2022.04.29(금)
1-3) 인프라 구축 환경
- Linux
- Terraform
- Ansible
- WordPress
- Apache
- PHP
- MariaDB
- AWS EC2
- AWS Security group
- AWS VPC
- AWS RDS
- AWS Auto Scaling
- AWS ALB
1-4) 아키텍쳐 구성

2. AWS 환경 배포
2-1) Vagrant 환경 구축
먼저 Controller로 사용할 가상의 환경을 Vagarnt를 이용해 구축합니다.
Vagrantfile에 VM 정보를 정의해줍니다.
Vagrant.configure("2") do |config|
    # Define VM
    config.vm.define "controller" do |centos|
        centos.vm.box = "centos/7"
        centos.vm.hostname = "controller"
        centos.vm.network "private_network", ip: "192.168.100.15"
        centos.vm.provider "virtualbox" do |vb|
            vb.name = "controller"
            vb.cpus = 2
            vb.memory = 2048
        end
    end
end
이후 Vagrant 접속
vagrant up controller
vagrant ssh controller
[vagrant@controller ~]$
2-2) Ansible 환경 구축
VM에 Ansible을 설치해줍니다.
sudo yum install centos-release-ansible-29 -y
sudo yum install ansible -y
설치 후 Ansible이 정상적으로 설치됐는지 확인해줍니다.
[vagrant@controller ~]$ ansible --version
ansible 2.9.27
  config file = /etc/ansible/ansible.cfg
  configured module search path = [u'/home/vagrant/.ansible/plugins/modules', u'/usr/share/ansible/plugins/modules']
  ansible python module location = /usr/lib/python2.7/site-packages/ansible
  executable location = /usr/bin/ansible
  python version = 2.7.5 (default, Apr  2 2020, 13:16:51) [GCC 4.8.5 20150623 (Red Hat 4.8.5-39)]
2-3) Ansible Playbook 작성
Ansible을 사용해 EC2 서버에 Wordpress를 설치해주기 위해서 Playbook을 작성해줍니다.
워드프레스의 설치 순서는 다음과 같습니다.
- amazon-linux-extras 명령어를 사용해서 PHP 설치
- Apache, mysql 설치
- Apache, mysql이 항상 실행되도록 enabled 값을 yes로 변경
- Wordpress 압축 파일 다운로드
- 압출 파일 압축 해제 후 Wordpress 설치
- MySQL에 Wordpress에서 사용할 DB 생성
- MySQL DB에 admin 유저 생성
- wp-config-sample 파일을 복사하여 파일 생성
- Wordpress와 DB가 연결되도록 복사한 파일 내용 수정 (DB 이름, DB 사용자 이름, 패스워드)
- DB 서버에 사용자 계정 추가 및 권한 부여
- DB는 테라폼을 사용해 만들 예정이기때문에 DB 앤드포인트는 추후에 변경할 예정입니다.
이 내용을 Playbook 문법으로 변경한 결과
- hosts: wordpress
  become: yes
  vars_files:
    - vars/wordpress.yaml
    - vars/php_repo.yaml
    - vars/database.yaml
  tasks:
    - name: Yum update
      yum:
        name: '*'
        state: latest
    - name: amazon-linux-extras install
      yum:
        name: amazon-linux-extras
        state: present
    - name: Setup PHP 7.4
      shell: amazon-linux-extras enable php7.4 epel

    - name: Install Apache, PHP and Database
      block:
        - name: Install Apache, PHP, Database Packages
          yum:
            name: '{{ wordpress["linux"]["packages"] }}'
            state: installed


    - name: Deploy Wordpress CMS
      block:
        - name: Download Wordpress Archive file
          get_url:
            url: '{{ wordpress_url }}'
            dest: ~/
        - name: Decompress Archive file
          unarchive:
            src: '~/{{ wordpress_filename }}'
            remote_src: yes
            dest: /var/www/html/
            owner: apache
            group: apache


    - name: Configure Database for Wordpress
      block:
        - name: Copy Database Configure File for Wordpress
          copy:
            src: /var/www/html/wordpress/wp-config-sample.php
            remote_src: yes
            dest: /var/www/html/wordpress/wp-config.php
            owner: apache
            group: apache
        - name: change DB Name
          replace:
            path: /var/www/html/wordpress/wp-config.php
            regexp: database_name_here
            replace: '{{ database["name"] }}'
        - name: change DB User
          replace:
            path: /var/www/html/wordpress/wp-config.php
            regexp: username_here
            replace: '{{ database["user"] }}'
        - name: change DB Password
          replace:
            path: /var/www/html/wordpress/wp-config.php
            regexp: password_here
            replace: '{{ database["pwd"] }}'
        - name: change DB EndPoint
          replace:
            path: /var/www/html/wordpress/wp-config.php
            regexp: localhost
            replace: '{{ database["endpoint"] }}'

    - name: create mariadb user
      mysql_user:
        name: '{{ database["user"] }}'
        password: '{{ database["pwd"] }}'
        host : '%'
        priv: '{{ database["name"] }}.*:ALL'
        state : present

    - name: Restart service
      block:
      - name: Restart Apache Service
        service:
          name: httpd
          state: restarted
          enabled: yes
      - name: Restart Database Service
        service:
          name: mariadb
          state: restarted
          enabled: yes
Playbook에 사용된 파일은 다음과 같습니다.
- /vars/database.yaml
endpoint는 추후 테라폼에서 DB 인스턴스를 생성한 후 변경해줍니다.
플레이북을 사용해서 한 번에 서버 설정을 하기위해 이런 방법을 선택했지만, 처음부터 다시 실행할때마다 endpoint 값을 localhost로 변경해야하는 불편한 점이 존재했습니다.
개선 방안 -> local-exec로 앤서블 Ad-Hoc를 사용하도록 짜놓는게 더 간편했을 것 같다.
---

database:
name: wordpress
user: wpadm
pwd: qwer1234
endpoint: localhost- /vars/php_repo.yaml
---

php\_remi\_repo:
pkg: [https://rpms.remirepo.net/enterprise/remi-release-7.rpm](https://rpms.remirepo.net/enterprise/remi-release-7.rpm)
safe:
name: remi-safe
mirror: [http://cdn.remirepo.net/enterprise/7/safe/mirror](http://cdn.remirepo.net/enterprise/7/safe/mirror)
php74:
name: remi-php74
mirror: [http://cdn.remirepo.net/enterprise/7/php74/mirror](http://cdn.remirepo.net/enterprise/7/php74/mirror)
gpgkey: file:///etc/pki/rpm-gpg/RPM-GPG-KEY-remi- /vars/wordpress.yaml
---

wordpress:
linux:
packages: httpd,php,php-mysqlnd,mariadb,mariadb-server,MySQL-python

wordpress_version: 5.9.3
wordpress_filename: "wordpress-{{ wordpress_version }}.tar.gz"
wordpress_url: "[https://wordpress.org/{{](https://wordpress.org/%7B%7B) wordpress_filename }}"- ansible.cfg
[defaults]
inventory = inventory.ini
ansible_managed = Ansible managed: {file} modified on %Y-%m-%d %H:%M:%S by {uid} on {host}
remote_user=ec2-user
host_key_checking=False
ask_pass=False
후에 사용할 공개키를 controller 서버에 생성해줍니다.
이 공개키를 사용해 AWS에 인스턴스에 사용할 키를 생성합니다.
[vagrant@controller ~\]$ ssh-keygen2-4) Terraform 환경 구축
이제 컨트롤러에 테라폼을 설치합니다.
참고 자료: https://www.terraform.io/downloads
sudo yum install -y yum-utils
sudo yum-config-manager --add-repo [https://rpm.releases.hashicorp.com/RHEL/hashicorp.repo](https://rpm.releases.hashicorp.com/RHEL/hashicorp.repo)
sudo yum -y install terraform

terraform --version
다음은 AWS-CLI를 설치하고 aws configure 명령어를 사용해서 AWS 아이디와 연동해줍니다.
참고 자료 : https://docs.aws.amazon.com/ko_kr/cli/latest/userguide/getting-started-install.html
cd ~
curl "[https://awscli.amazonaws.com/awscli-exe-linux-x86\_64.zip"](https://awscli.amazonaws.com/awscli-exe-linux-x86_64.zip") -o "awscliv2.zip"
sudo yum install -y unzip
unzip awscliv2.zip
sudo ./aws/install

aws --version

aws configure
aws sts get-caller-identity
이제 AWS로부터 시간 정보를 받아오지만, 만약 시간 간격이 발생하면 테라폼 실행이 불가능하기에 혹시 모를 시간 간격을 대비해서 컨트롤러의 시간 설정도 변경해줍니다.
sudo vi /etc/chrony.conf

# Please consider joining the pool ([http://www.pool.ntp.org/join.html](http://www.pool.ntp.org/join.html)).

server 3.kr.pool.ntp.org iburst
server 1.asia.pool.ntp.org iburst
server 3.asia.pool.ntp.org iburst

sudo systemctl restart chronyd
timedatectl set-ntp true
sudo timedatectl set-timezone Asia/Seoul
chronyc sources -v
이제 해당 폴더에서 사용할 수 있도록 테라폼을 초기화합니다.
terraform init이제 테라폼 초기 설정이 완료됐습니다.
2-5) Terraform 파일 작성
이제 테라폼을 사용해서 VPC와 오토스케일을 구축할 수 있도록 파일을 작성합니다.
테라폼의 생성 순서 :
- VPC
- DB 인스턴스
- EC2 인스턴스
- 앤서블을 사용해 플레이북 적용
- 인스턴스 이미지 찍기
- 이미지를 이용해 Auto Scaling Group 생성
- 로드 밸런서 생성
- 오토 스케일링 그룹과 로드 밸런서 연결
- VPC
VPC를 생성할 땐 퍼블릭, 프라이빗 서브넷 뿐만 아니라 DB 인스턴스 생성에 필요한 서브넷 그룹을 별도로 생성해 다음 DB 인스턴스 생성에서 사용합니다.
module "app_vpc" {
  source = "terraform-aws-modules/vpc/aws"

  name = "app-vpc"
  cidr = "10.0.0.0/16"

  azs = [
    "ap-northeast-2a",
    "ap-northeast-2c"
  ]
  public_subnets = [
    "10.0.0.0/24",
    "10.0.1.0/24"
  ]
  private_subnets = [
    "10.0.10.0/24",
    "10.0.11.0/24"
  ]
  database_subnets = [
    "10.0.20.0/24",
    "10.0.21.0/24"
  ]
  enable_nat_gateway     = true
  single_nat_gateway     = true
  one_nat_gateway_per_az = false

  create_database_subnet_group           = true #RDS용 서브넷 구성
  create_database_subnet_route_table     = true #RDS용 서브넷의 라우팅 테이블 구성
  create_database_internet_gateway_route = true #RDS용 라우팅 테이블에 인터넷 게이트웨이 연결 설정 여부
  database_subnet_group_name             = "wordpress_db_group"

  enable_dns_hostnames = "true" #DNS Hostname Enable
  enable_dns_support   = "true" #DNS Support Enable

  tags = local.common_tags
}- DB 인스턴스
resource "aws_db_instance" "wordpressDB" {

  db_subnet_group_name   = module.app_vpc.database_subnet_group_name
  vpc_security_group_ids = [aws_security_group.db_sg.id]

  engine              = "mysql"
  engine_version      = "5.7.37"
  instance_class      = "db.m5.xlarge"
  allocated_storage   = 20
  skip_final_snapshot = true
  identifier          = "wordpressdb"

  name     = var.db_info["name"]
  username = var.db_info["username"]
  password = var.db_info["password"]
  port     = "3306"

  depends_on = [module.app_vpc]

}- EC2 생성
이제 VPC와 워드프레스용 DB가 생성됐으니 EC2 인스턴스를 생성해서 이미지를 찍어줄 차례입니다.
먼저 앞으로 사용하게 될 키 페어를 등록해주고 인스턴스에서 키페어를 사용합니다.
resource "aws_key_pair" "app_server_key" {
  key_name   = "app_server_key"
  public_key = file("/home/vagrant/.ssh/id_rsa.pub")
}
워드 프레스용 인스턴스를 만들고, local-exec를 사용해 만들어진 인스턴스의 IP를 인벤토리 파일에 적어줍니다.
그 후 이전에 만든 DB 엔드포인트를 앤서블 변수 파일에 추가해 워드프레스 연결이 되도록 준비해줍니다.
그 후 플레이북을 사용해 EC2 인스턴스에 워드프레스 설치를 완료합니다.
resource "aws_instance" "wordpress_ec2" {

  ami                    = var.aws_amazon_linux_ami
  instance_type          = "t3.small"
  availability_zone      = var.aws_availability_zone
  vpc_security_group_ids = [aws_security_group.img_sg.id]
  key_name               = aws_key_pair.app_server_key.key_name
  subnet_id              = module.app_vpc.public_subnets[0]


  provisioner "local-exec" {
    command = "echo ${self.public_ip} ansible_user=ec2-user > inventory.ini"
  }

  provisioner "local-exec" {
    command = "sudo sed -i 's/localhost/${aws_db_instance.wordpressDB.endpoint}/g' ~/pj/vars/database.yaml"
  }

  connection {
    user        = "ec2-user"
    host        = self.public_ip
    private_key = file("/home/vagrant/.ssh/id_rsa")
    timeout     = "1m"
  }

  provisioner "local-exec" {
    command = "ansible-playbook -i inventory.ini wordpress.yaml -b"
  }

  tags = local.common_tags

  depends_on = [module.app_vpc, aws_db_instance.wordpressDB]
}- EC2 이미지 생성
이제 만들어진 워드프레스를 이미지로 찍습니다. resource "aws_ami_from_instance" "wordpress_trfimg" { name = "wordpress_trfimg" source_instance_id = aws_instance.wordpress_ec2.id depends_on = [aws_instance.wordpress_ec2] }- ASG ( Auto Scaling Group)
이제 만들어진 이미지를 가지고 오토 스케일링 그룹을 생성합니다.
module "aws_asg" {
  source  = "terraform-aws-modules/autoscaling/aws"
  version = "~> 4.0"

  # Autoscaling group
  name = "wordpress-asg"
  key_name                  = aws_key_pair.app_server_key.key_name
  min_size                  = 1
  max_size                  = 4
  desired_capacity          = 2
  wait_for_capacity_timeout = 0
  health_check_type         = "EC2"
  vpc_zone_identifier       = module.app_vpc.private_subnets

  # Launch template
  lt_name                = "wordpress-asg"
  description            = "wordpress with IaC"
  update_default_version = true

  use_lt    = true
  create_lt = true

  image_id          = aws_ami_from_instance.wordpress_trfimg.id
  instance_type     = "t3.micro"
  ebs_optimized     = true
  enable_monitoring = true

  block_device_mappings = [
    {
      # Root volume
      device_name = "/dev/xvda"
      no_device   = 0
      ebs = {
        delete_on_termination = true
        encrypted             = true
        volume_size           = 20
        volume_type           = "gp2"
      }
    }
  ]

  network_interfaces = [
    {
      delete_on_termination = true
      description           = "wordpress-instance"
      device_index          = 0
      security_groups       = [aws_security_group.wordpress_sg.id]
    }
  ]

  tags = [local.common_tags]

  depends_on = [module.app_vpc, module.alb]
}- ALB (Application Load Balancer)
이제 오토 스케일링으로 만들어진 인스턴스에 부하를 나눠줄 로드 밸런서를 생성합니다.
module "alb" {
source = "terraform-aws-modules/alb/aws"
version = "~> 6.0"

name = "wordpress-alb"

load_balancer_type = "application"

vpc_id = module.app_vpc.vpc_id
subnets = module.app_vpc.public_subnets
security_groups = [aws_security_group.alb_sg.id]

target_groups = [
{
name_prefix = "tg-"
backend_protocol = "HTTP"
backend_port = 80
target_type = "instance"

}

]

http_tcp_listeners = [
{
port = 80
protocol = "HTTP"
target_group_index = 0
}
]

tags = local.common_tags

depends_on = [module.app_vpc]
}
마지막으로 로드 밸런서와 오토 스케일링 그룹을 attachment를 사용해 연결해줍니다.
resource "aws\_autoscaling\_attachment" "asg\_attachment\_bar" {
autoscaling\_group\_name = module.aws\_asg.autoscaling\_group\_name
alb\_target\_group\_arn = module.alb.target\_group\_arns\[0\]
}
생성 완료.
2-6) 테라폼 실행 결과 확인
terraform apply --auto-approve
실행 결과

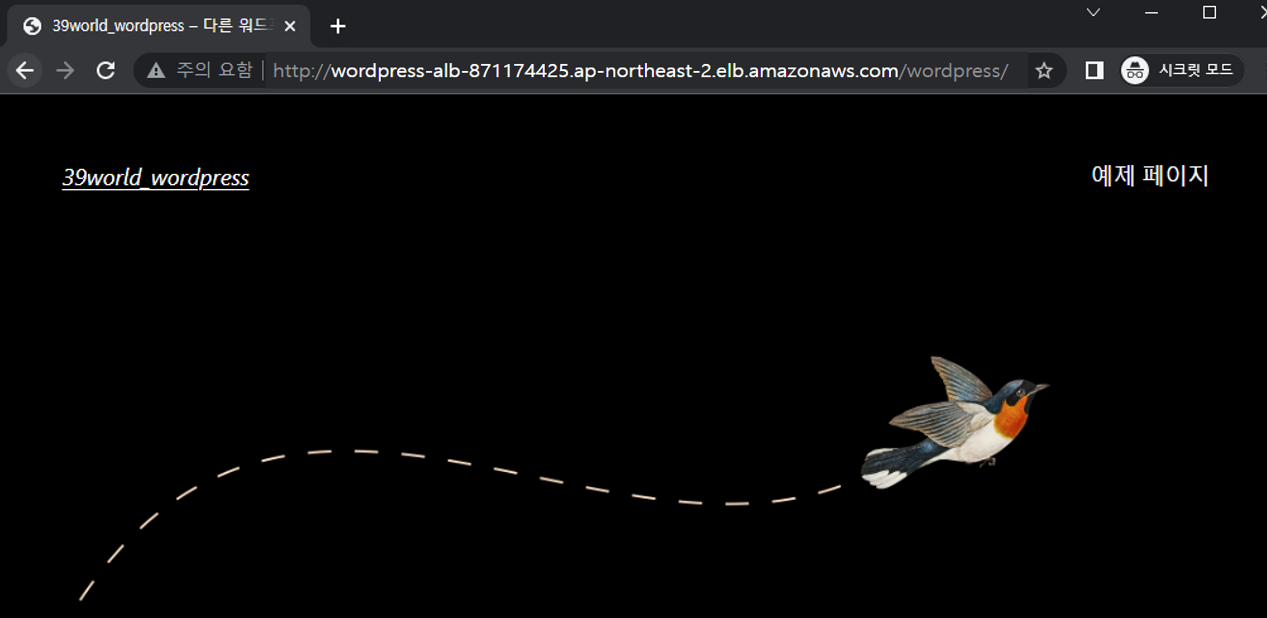
처음 이미지를 찍기위해 만들었떤 인스턴스 하나와 오토 스케일링 그룹에 의해 만들어진 2개의 인스턴스를 확인할 수 있다. 이외에도 로드밸런서, 대상 그룹, 오토 스케일링 그룹, 서브넷 등 확인이 가능하다.
만들어진 로드 밸런스의 DNS 서버로 접속한다면 다음과 같이 워드프레스로 접속되는 것을 확인할 수 있다.
'클라우드 > 프로젝트' 카테고리의 다른 글
| AWS | AWS 클라우드를 이용한 고가용성 Wordpress 서비스 배포 (0) | 2022.04.06 |
|---|---|
| 미니 프로젝트 | 리눅스 인프라 구축을 통한 Wordpress 구현 (0) | 2022.03.16 |

